Difference between revisions of "Caravans"
m (→Caravan routes: Fixed a minor issue) |
(→Caravan agents: Added four additional images showing caravan leader locations (Wind of War, Hawthorne, New Vault City, Gordon's Gas Station)) |
||
| (4 intermediate revisions by the same user not shown) | |||
| Line 61: | Line 61: | ||
*<u>Route segment</u>: the two locations that the caravan travels between in sequence; to start the next segment you will need to talk to the caravan leader that spawns at the destination of the previous | *<u>Route segment</u>: the two locations that the caravan travels between in sequence; to start the next segment you will need to talk to the caravan leader that spawns at the destination of the previous | ||
| − | *<u> | + | *<u>Individual contribution per encounter</u>: the amount of progress that will be awarded to the group for each player guarding the caravan every time an encounter is completed |
| − | *<u> | + | *<u>Total group progress per encounter</u>: the final amount of progress that a caravan group will be awarded per encounter |
| − | + | {| class="wikitable" style="text-align: center;" | |
| − | |||
| − | |||
| − | {| class="wikitable" | ||
|+ Goods'n'Go | |+ Goods'n'Go | ||
| − | ! # !! Route segment !! <small> | + | ! # !! Route segment !! <small>Individual contribution<br>per encounter</small> !! <small>Total group progress<br>per encounter</small> |
|- | |- | ||
| − | | 1 || The Hub → Junktown || | + | | 1 || The Hub → Junktown || 0–50% || 25–100% |
|- | |- | ||
| − | | 2 || Junktown → | + | | 2 || Junktown → Las Vegas || 0–10% || 5–20% |
|- | |- | ||
| − | | 3 || | + | | 3 || Las Vegas → Salt Lake City || 0–1% || 0–2% |
|- | |- | ||
| − | | 4 || Salt Lake City → | + | | 4 || Salt Lake City → Las Vegas || 0–1% || 0–2% |
|- | |- | ||
| − | | 5 || | + | | 5 || Las Vegas → Junktown || 0–10% || 5–20% |
|- | |- | ||
| − | | 6 || Junktown → The Hub || | + | | 6 || Junktown → The Hub || 0–50% || 25–100% |
|} | |} | ||
| − | {| class="wikitable" | + | {| class="wikitable" style="text-align: center;" |
|+ Hang Transportation | |+ Hang Transportation | ||
| − | ! # !! Route segment !! <small> | + | ! # !! Route segment !! <small>Individual contribution<br>per encounter</small> !! <small>Total group progress<br>per encounter</small> |
|- | |- | ||
| − | | 1 || The Hub → Sarmatia || | + | | 1 || The Hub → Sarmatia || 0–15% || 7–30% |
|- | |- | ||
| − | | 2 || Sarmatia → Steel Town || | + | | 2 || Sarmatia → Steel Town || 0–15% || 7–30% |
|- | |- | ||
| − | | 3 || Steel Town → San Francisco || | + | | 3 || Steel Town → San Francisco || 0–15% || 7–30% |
|- | |- | ||
| − | | 4 || San Francisco → Steel Town || | + | | 4 || San Francisco → Steel Town || 0–15% || 7–30% |
|- | |- | ||
| − | | 5 || Steel Town → Sarmatia || | + | | 5 || Steel Town → Sarmatia || 0–15% || 7–30% |
|- | |- | ||
| − | | 6 || Sarmatia → The Hub || | + | | 6 || Sarmatia → The Hub || 0–15% || 7–30% |
|} | |} | ||
| − | {| class="wikitable" | + | {| class="wikitable" style="text-align: center;" |
|+ Gun Runners | |+ Gun Runners | ||
| − | ! # !! Route segment !! <small> | + | ! # !! Route segment !! <small>Individual contribution<br>per encounter</small> !! <small>Total group progress<br>per encounter</small> |
|- | |- | ||
| − | | 1 || The Hub → New Adytum || | + | | 1 || The Hub → New Adytum || 0–33% || 16–66% |
|- | |- | ||
| − | | 2 || New Adytum → San Diego || | + | | 2 || New Adytum → San Diego || 0–15% || 7–30% |
|- | |- | ||
| − | | 3 || San Diego → Point Poseidon || | + | | 3 || San Diego → Point Poseidon || 0–15% || 7–30% |
|- | |- | ||
| − | | 4 || Point Poseidon → The Glow || | + | | 4 || Point Poseidon → The Glow || 0–50% || 25–100% |
|- | |- | ||
| − | | 5 || The Glow → Necropolis || | + | | 5 || The Glow → Necropolis || 0–10% || 5–20% |
|- | |- | ||
| − | | 6 || Necropolis → The Hub || | + | | 6 || Necropolis → The Hub || 0–20% || 10–40% |
|} | |} | ||
| − | {| class="wikitable" | + | {| class="wikitable" style="text-align: center;" |
|+ Van Graffs | |+ Van Graffs | ||
| − | ! # !! Route segment !! <small> | + | ! # !! Route segment !! <small>Individual contribution<br>per encounter</small> !! <small>Total group progress<br>per encounter</small> |
|- | |- | ||
| − | | 1 || The Hub → Hawthorne || | + | | 1 || The Hub → Hawthorne || 0–6% || 3–12% |
|- | |- | ||
| − | | 2 || Hawthorne → New Reno || | + | | 2 || Hawthorne → New Reno || 0–10% || 5–20% |
|- | |- | ||
| − | | 3 || New Reno → New Vault City || | + | | 3 || New Reno → New Vault City || 0–10% || 5–20% |
|- | |- | ||
| − | | 4 || New Vault City → Modoc || | + | | 4 || New Vault City → Modoc || 0–25% || 12–50% |
|- | |- | ||
| − | | 5 || Modoc → New Vault City || | + | | 5 || Modoc → New Vault City || 0–25% || 12–50% |
|- | |- | ||
| − | | 6 || New Vault City → New Reno || | + | | 6 || New Vault City → New Reno || 0–10% || 5–20% |
|- | |- | ||
| − | | 7 || New Reno → Hawthorne || | + | | 7 || New Reno → Hawthorne || 0–10% || 5–20% |
|- | |- | ||
| − | | 8 || Hawthorne → The Hub || | + | | 8 || Hawthorne → The Hub || 0–6% || 3–12% |
|} | |} | ||
| − | {| class="wikitable" | + | {| class="wikitable" style="text-align: center;" |
|+ Stockman's Association | |+ Stockman's Association | ||
| − | ! # !! Route segment !! <small> | + | ! # !! Route segment !! <small>Individual contribution<br>per encounter</small> !! <small>Total group progress<br>per encounter</small> |
|- | |- | ||
| − | | 1 || The Hub → Gordon's Gas Station || | + | | 1 || The Hub → Gordon's Gas Station || 0–5% || 2–10% |
|- | |- | ||
| − | | 2 || Gordon's Gas Station → Redding || | + | | 2 || Gordon's Gas Station → Redding || 0–15% || 7–30% |
|- | |- | ||
| − | | 3 || Redding → The Den || | + | | 3 || Redding → The Den || 0–15% || 7–30% |
|- | |- | ||
| − | | 4 || The Den → Klamath || | + | | 4 || The Den → Klamath || 0–66% || 33–132% |
|- | |- | ||
| − | | 5 || Klamath → The Den || | + | | 5 || Klamath → The Den || 0–66% || 33–132% |
|- | |- | ||
| − | | 6 || The Den → Redding || | + | | 6 || The Den → Redding || 0–15% || 7–30% |
|- | |- | ||
| − | | 7 || Redding → Gordon's Gas Station || | + | | 7 || Redding → Gordon's Gas Station || 0–15% || 7–30% |
|- | |- | ||
| − | | 8 || Gordon's Gas Station → The Hub || | + | | 8 || Gordon's Gas Station → The Hub || 0–5% || 2–10% |
|} | |} | ||
| − | {| class="wikitable" | + | {| class="wikitable" style="text-align: center;" |
|+ Crimson Caravan | |+ Crimson Caravan | ||
| − | ! # !! Route segment !! <small> | + | ! # !! Route segment !! <small>Individual contribution<br>per encounter</small> !! <small>Total group progress<br>per encounter</small> |
|- | |- | ||
| − | | 1 || The Hub → Wind of War || | + | | 1 || The Hub → Wind of War || 0–10% || 5–20% |
|- | |- | ||
| − | | 2 || Wind of War → NCR || | + | | 2 || Wind of War → NCR || 0–33% || 16–66% |
|- | |- | ||
| − | | 3 || NCR → Broken Hills || | + | | 3 || NCR → Broken Hills || 0–10% || 5–20% |
|- | |- | ||
| − | | 4 || Broken Hills → Vault 8 || | + | | 4 || Broken Hills → Vault 8 || 0–7% || 3–14% |
|- | |- | ||
| − | | 5 || Vault 8 → Gecko || | + | | 5 || Vault 8 → Gecko || 0–66% || 33–132% |
|- | |- | ||
| − | | 6 || Gecko → Broken Hills || | + | | 6 || Gecko → Broken Hills || 0–10% || 5–20% |
|- | |- | ||
| − | | 7 || Broken Hills → NCR || | + | | 7 || Broken Hills → NCR || 0–33% || 16–66% |
|- | |- | ||
| − | | 8 || NCR → Wind of War || | + | | 8 || NCR → Wind of War || 0–10% || 5–20% |
|- | |- | ||
| − | | 9 || Wind of War → The Hub || | + | | 9 || Wind of War → The Hub || 0–10% || 5–20% |
|} | |} | ||
| − | {| class="wikitable" | + | {| class="wikitable" style="text-align: center;" |
|+ Far Go Traders | |+ Far Go Traders | ||
| − | ! # !! Route segment !! <small> | + | ! # !! Route segment !! <small>Individual contribution<br>per encounter</small> !! <small>Total group progress<br>per encounter</small> |
|- | |- | ||
| − | | 1 || The Hub → Necropolis || | + | | 1 || The Hub → Necropolis || 0–20% || 10–40% |
|- | |- | ||
| − | | 2 || Necropolis → Junktown || | + | | 2 || Necropolis → Junktown || 0–20% || 10–40% |
|- | |- | ||
| − | | 3 || Junktown → Wind of War || | + | | 3 || Junktown → Wind of War || 0–20% || 10–40% |
|- | |- | ||
| − | | 4 || Wind of War → | + | | 4 || Wind of War → Las Vegas || 0–15% || 7–30% |
|- | |- | ||
| − | | 5 || | + | | 5 || Las Vegas → NCR || 0–15% || 7–30% |
|- | |- | ||
| − | | 6 || NCR → Hawthorne || | + | | 6 || NCR → Hawthorne || 0–20% || 10–40% |
|- | |- | ||
| − | | 7 || Hawthorne → Broken Hills || | + | | 7 || Hawthorne → Broken Hills || 0–10% || 5–20% |
|- | |- | ||
| − | | 8 || Broken Hills → Salt Lake City || | + | | 8 || Broken Hills → Salt Lake City || 0–6% || 3–12% |
|- | |- | ||
| − | | 9 || Salt Lake City → Gecko || | + | | 9 || Salt Lake City → Gecko || 0–8% || 4–16% |
|- | |- | ||
| − | | 10 || Gecko → Vault 8 || | + | | 10 || Gecko → Vault 8 || 0–66% || 33–132% |
|- | |- | ||
| − | | 11 || Vault 8 → Modoc || | + | | 11 || Vault 8 → Modoc || 0–10% || 5–20% |
|- | |- | ||
| − | | 12 || Modoc → New Vault City || | + | | 12 || Modoc → New Vault City || 0–25% || 12–50% |
|- | |- | ||
| − | | 13 || New Vault City → The Den || | + | | 13 || New Vault City → The Den || 0–15% || 7–30% |
|- | |- | ||
| − | | 14 || The Den → Klamath || | + | | 14 || The Den → Klamath || 0–66% || 33–132% |
|- | |- | ||
| − | | 15 || Klamath → Redding || | + | | 15 || Klamath → Redding || 0–8% || 4–16% |
|- | |- | ||
| − | | 16 || Redding → New Reno || | + | | 16 || Redding → New Reno || 0–10% || 5–20% |
|- | |- | ||
| − | | 17 || New Reno → Gordon's Gas Station || | + | | 17 || New Reno → Gordon's Gas Station || 0–25% || 12–50% |
|- | |- | ||
| − | | 18 || Gordon's Gas Station → San Francisco || | + | | 18 || Gordon's Gas Station → San Francisco || 0–8% || 4–16% |
|- | |- | ||
| − | | 19 || San Francisco → Steel Town || | + | | 19 || San Francisco → Steel Town || 0–15% || 7–30% |
|- | |- | ||
| − | | 20 || Steel Town → Sarmatia || | + | | 20 || Steel Town → Sarmatia || 0–15% || 7–30% |
|- | |- | ||
| − | | 21 || Sarmatia → New Adytum || | + | | 21 || Sarmatia → New Adytum || 0–10% || 5–20% |
|- | |- | ||
| − | | 22 || New Adytum → San Diego || | + | | 22 || New Adytum → San Diego || 0–15% || 7–30% |
|- | |- | ||
| − | | 23 || San Diego → Point Poseidon || | + | | 23 || San Diego → Point Poseidon || 0–15% || 7–30% |
|- | |- | ||
| − | | 24 || Point Poseidon → The Glow || | + | | 24 || Point Poseidon → The Glow || 0–50% || 25–100% |
|- | |- | ||
| − | | 25 || The Glow → The Hub || | + | | 25 || The Glow → The Hub || 0–6% || 3–12% |
|} | |} | ||
| + | |||
| + | === Example === | ||
| + | |||
| + | *Your Far Go Traders caravan is going from NCR to Hawthorne (route segment #6) | ||
| + | *Your individual contribution per encounter is 0–20%, which means that you can contribute as much as 20% or as little as 0% to the total progress of your group | ||
| + | *Your group's total progress per encounter is 10–40%, which means that the group as a whole can progress by as much as 40% or as little as 10% | ||
| + | *If you're playing solo, and roll 0%, the 10% lower cap will help you by increasing your progress from 0% to 10% | ||
| + | *If you're playing in a group of 5 players, and you all roll 20%, the upper cap will hinder you by reducing your progress from 100% to 40% | ||
| + | |||
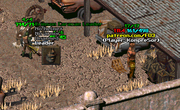
| + | == Caravan agents == | ||
| + | |||
| + | When a caravan completes a route segment, players must talk to the caravan leader/master/foreman/driver/trader/agent that spawns in the location they traveled to if they wish to continue the run. | ||
| + | |||
| + | If you're tired of playing hide-and-seek with your current caravan leader, here's where he's hiding: | ||
| + | |||
| + | <gallery widths="180" heights="120"> | ||
| + | File:Caravan Agent in The Hub.png|<center>The Hub</center> | ||
| + | File:Caravan Agent in New Reno.png|<center>New Reno (east)</center> | ||
| + | File:Caravan Agent in Wind of War.jpg|<center>Wind of War</center> | ||
| + | File:Caravan Agent in Steel Town.png|<center>Steel Town</center> | ||
| + | File:Caravan Agent in San Diego.png|<center>San Diego</center> | ||
| + | File:Caravan Agent in Redding.png|<center>Redding</center> | ||
| + | File:Caravan Agent in Modoc.png|<center>Modoc</center> | ||
| + | File:Caravan Agent in Hawthorne.jpg|<center>Hawthorne</center> | ||
| + | File:Caravan Agent in Salt Lake City.png|<center>Salt Lake City (north)</center> | ||
| + | File:Caravan Agent in New Vault City.jpg|<center>New Vault City</center> | ||
| + | File:Caravan Agent at Gordon's Gas Station.jpg|<center>Gordon's Gas Station</center> | ||
| + | |||
| + | </gallery> | ||
[[Category:Quests]] | [[Category:Quests]] | ||
Latest revision as of 10:53, 15 June 2026
Caravans are co-op escort missions that vary in difficulty but have a common objective: protect a group of traders, and their precious cargo, on their way from point A to point B.
A caravan progresses towards its destination through a series of random encounters. The progress earned from an encounter depends on the route segment where the encounter takes place and the caravan's player count. Because of this, groups can finish caravans faster than solo players provided they can handle the difficulty, which scales with group size.
Basic information
- When a caravan run starts, there is an announcement in the #eventlog channel (Discord invite link)
- Caravan runs have an open lobby for 3 minutes before departure
- There is no limit to the number of players/companions that can join a caravan
- The caravan leader and NPC guards start with T1/T2 items but players have an option of upgrading their gear (armor, helmets, and weapons) via donation
- Caravans work like they did in Fallout 2, going from location to location instantly
- Caravan encounters cannot be entered from the world map
- Caravan encounters scale with the number of players and the difficulty of the route
- All caravan members are on the same team, which means that they share XP and Leader buffs. This includes players and the NPCs they control, the caravan leader, and caravan guard NPCs
- Players cannot leave the caravan until it reaches the next point on its route which can take significantly longer than an hour
- If the current caravan leader dies, one of guards assumes his role
- NPC friendly fire is mostly disabled but AoE ground effects might bypass this so a bit of caution is needed
- A caravan run is successful if "caravan progress" reaches 100%; individual encounters grant progress based on their difficulty: easy ones grant between 2% and 5%, the toughest ones can grant much more
- Failure to complete a caravan run results in the loss of 5 caravan reputation points (capped at 0)
Rewards
Rewards for successfully getting a caravan to its destination may include:
- Currency
- Vault-Tec Cases or faction cases
- Level Books
- Caravan reputation points if you manage to complete the full route (from The Hub to The Hub)
- Reputation points allow you to purchase rare items, combat implants, gear mods, and dungeon keys from a dedicated store at a significant discount; the inventory scales with the current Patch number
- The caravan reputation trader refreshes his inventory once an hour
- Completing a full Far Go Traders run has a 10% x Patch chance of rewarding a WE stat or a mutation
Caravan routes
There are seven different caravan routes. Completing an entire route (all of its segments) rewards reputation proportional to the route's length and difficulty.
| Caravan reputation rewards by route | ||||||||||||||||
|
The tables below contain the following information:
- Route segment: the two locations that the caravan travels between in sequence; to start the next segment you will need to talk to the caravan leader that spawns at the destination of the previous
- Individual contribution per encounter: the amount of progress that will be awarded to the group for each player guarding the caravan every time an encounter is completed
- Total group progress per encounter: the final amount of progress that a caravan group will be awarded per encounter
| # | Route segment | Individual contribution per encounter |
Total group progress per encounter |
|---|---|---|---|
| 1 | The Hub → Junktown | 0–50% | 25–100% |
| 2 | Junktown → Las Vegas | 0–10% | 5–20% |
| 3 | Las Vegas → Salt Lake City | 0–1% | 0–2% |
| 4 | Salt Lake City → Las Vegas | 0–1% | 0–2% |
| 5 | Las Vegas → Junktown | 0–10% | 5–20% |
| 6 | Junktown → The Hub | 0–50% | 25–100% |
| # | Route segment | Individual contribution per encounter |
Total group progress per encounter |
|---|---|---|---|
| 1 | The Hub → Sarmatia | 0–15% | 7–30% |
| 2 | Sarmatia → Steel Town | 0–15% | 7–30% |
| 3 | Steel Town → San Francisco | 0–15% | 7–30% |
| 4 | San Francisco → Steel Town | 0–15% | 7–30% |
| 5 | Steel Town → Sarmatia | 0–15% | 7–30% |
| 6 | Sarmatia → The Hub | 0–15% | 7–30% |
| # | Route segment | Individual contribution per encounter |
Total group progress per encounter |
|---|---|---|---|
| 1 | The Hub → New Adytum | 0–33% | 16–66% |
| 2 | New Adytum → San Diego | 0–15% | 7–30% |
| 3 | San Diego → Point Poseidon | 0–15% | 7–30% |
| 4 | Point Poseidon → The Glow | 0–50% | 25–100% |
| 5 | The Glow → Necropolis | 0–10% | 5–20% |
| 6 | Necropolis → The Hub | 0–20% | 10–40% |
| # | Route segment | Individual contribution per encounter |
Total group progress per encounter |
|---|---|---|---|
| 1 | The Hub → Hawthorne | 0–6% | 3–12% |
| 2 | Hawthorne → New Reno | 0–10% | 5–20% |
| 3 | New Reno → New Vault City | 0–10% | 5–20% |
| 4 | New Vault City → Modoc | 0–25% | 12–50% |
| 5 | Modoc → New Vault City | 0–25% | 12–50% |
| 6 | New Vault City → New Reno | 0–10% | 5–20% |
| 7 | New Reno → Hawthorne | 0–10% | 5–20% |
| 8 | Hawthorne → The Hub | 0–6% | 3–12% |
| # | Route segment | Individual contribution per encounter |
Total group progress per encounter |
|---|---|---|---|
| 1 | The Hub → Gordon's Gas Station | 0–5% | 2–10% |
| 2 | Gordon's Gas Station → Redding | 0–15% | 7–30% |
| 3 | Redding → The Den | 0–15% | 7–30% |
| 4 | The Den → Klamath | 0–66% | 33–132% |
| 5 | Klamath → The Den | 0–66% | 33–132% |
| 6 | The Den → Redding | 0–15% | 7–30% |
| 7 | Redding → Gordon's Gas Station | 0–15% | 7–30% |
| 8 | Gordon's Gas Station → The Hub | 0–5% | 2–10% |
| # | Route segment | Individual contribution per encounter |
Total group progress per encounter |
|---|---|---|---|
| 1 | The Hub → Wind of War | 0–10% | 5–20% |
| 2 | Wind of War → NCR | 0–33% | 16–66% |
| 3 | NCR → Broken Hills | 0–10% | 5–20% |
| 4 | Broken Hills → Vault 8 | 0–7% | 3–14% |
| 5 | Vault 8 → Gecko | 0–66% | 33–132% |
| 6 | Gecko → Broken Hills | 0–10% | 5–20% |
| 7 | Broken Hills → NCR | 0–33% | 16–66% |
| 8 | NCR → Wind of War | 0–10% | 5–20% |
| 9 | Wind of War → The Hub | 0–10% | 5–20% |
| # | Route segment | Individual contribution per encounter |
Total group progress per encounter |
|---|---|---|---|
| 1 | The Hub → Necropolis | 0–20% | 10–40% |
| 2 | Necropolis → Junktown | 0–20% | 10–40% |
| 3 | Junktown → Wind of War | 0–20% | 10–40% |
| 4 | Wind of War → Las Vegas | 0–15% | 7–30% |
| 5 | Las Vegas → NCR | 0–15% | 7–30% |
| 6 | NCR → Hawthorne | 0–20% | 10–40% |
| 7 | Hawthorne → Broken Hills | 0–10% | 5–20% |
| 8 | Broken Hills → Salt Lake City | 0–6% | 3–12% |
| 9 | Salt Lake City → Gecko | 0–8% | 4–16% |
| 10 | Gecko → Vault 8 | 0–66% | 33–132% |
| 11 | Vault 8 → Modoc | 0–10% | 5–20% |
| 12 | Modoc → New Vault City | 0–25% | 12–50% |
| 13 | New Vault City → The Den | 0–15% | 7–30% |
| 14 | The Den → Klamath | 0–66% | 33–132% |
| 15 | Klamath → Redding | 0–8% | 4–16% |
| 16 | Redding → New Reno | 0–10% | 5–20% |
| 17 | New Reno → Gordon's Gas Station | 0–25% | 12–50% |
| 18 | Gordon's Gas Station → San Francisco | 0–8% | 4–16% |
| 19 | San Francisco → Steel Town | 0–15% | 7–30% |
| 20 | Steel Town → Sarmatia | 0–15% | 7–30% |
| 21 | Sarmatia → New Adytum | 0–10% | 5–20% |
| 22 | New Adytum → San Diego | 0–15% | 7–30% |
| 23 | San Diego → Point Poseidon | 0–15% | 7–30% |
| 24 | Point Poseidon → The Glow | 0–50% | 25–100% |
| 25 | The Glow → The Hub | 0–6% | 3–12% |
Example
- Your Far Go Traders caravan is going from NCR to Hawthorne (route segment #6)
- Your individual contribution per encounter is 0–20%, which means that you can contribute as much as 20% or as little as 0% to the total progress of your group
- Your group's total progress per encounter is 10–40%, which means that the group as a whole can progress by as much as 40% or as little as 10%
- If you're playing solo, and roll 0%, the 10% lower cap will help you by increasing your progress from 0% to 10%
- If you're playing in a group of 5 players, and you all roll 20%, the upper cap will hinder you by reducing your progress from 100% to 40%
Caravan agents
When a caravan completes a route segment, players must talk to the caravan leader/master/foreman/driver/trader/agent that spawns in the location they traveled to if they wish to continue the run.
If you're tired of playing hide-and-seek with your current caravan leader, here's where he's hiding:
The Hub 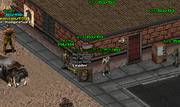
New Reno (east) 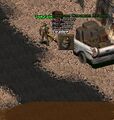
Wind of War 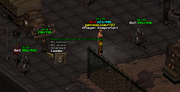
Steel Town 
San Diego 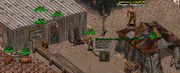
Redding 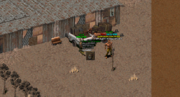
Modoc 
Hawthorne 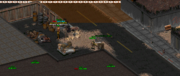
Salt Lake City (north) 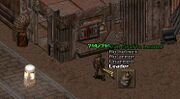
New Vault City 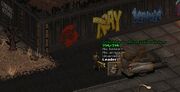
Gordon's Gas Station


